创建页面
目标
编写一个B端常用的增删查改的页面,以人员信息举例。功能包含:通过表格展示人员信息,支持搜索条件查询以及人员的新建,编辑,删除和查看。效果如下:
实现
创建文件
在pages目录中添加list页面,创建list目录,里面添加名称为list的dml和js文件,分别用于存放页面模板和逻辑的代码。由于新建和编辑人员的弹框逻辑有很多共性,可以抽出一个自定义组件使用,在list目录中创建custompop自定义组件的相关目录和文件。
my_demo
    │
    ├── pages
    │     ├── list
    │     │     ├── list.dml
    │     │     ├── list.js
    │     │     └── custompop
    │     │             ├── custompop.dml
    │     │             └── custompop.js
编写页面逻辑
- 编写list的页面
js中需要使用XPage()构建一个page实例。
dml中使用page组件创建一个空页面,设置标题为人员信息。在actions中添加页面级的操作按钮新建人员。
page等容器组件下支持slot:actions为该容器的操作区域,主要存放button组件。关于page组件的更多说明请查看page组件。
<page title="人员信息">
 <actions>
    <button text="新建人员"></button>
 </actions>
</page>
export default XPage({
    //存放模板使用的数据
    data: {

    },
    //页面进入时执行
    show(){

    },
});
- 编写查询表单和内容表格
在页面的头部区域head添加查询表单form(head区域一般form的type一般为search),用于快捷筛选人员信息。表单提交时调用this.getComponent('myTable')得到表格实例,其中myTable为table定义的x属性值,x是所有组件都具备的通用能力。然后执行表格暴露的API query函数,主动查询表格数据并更新表格,支持传入参数,如下:
this.getComponent('myTable').query({params: value})
CabinX的表单有form和item组成,item上通过node指定使用组件类型。name作为数据的唯一key值,在设置表单数据和提交时的数据结构中都是使用该name。
内容区域添加一个超级table组件展示人员的信息,设置x属性作为唯一标识,在查找该组件时可用。超级表格支持columnSettable设置自定义列,可修改列的位置,展示隐藏列等等,当对列进行操作后会触发column-changed事件执行。
CabinX中如table等很多组件有远程查询数据的逻辑,这些远程接口的调用和组件的渲染等等逻辑全部内置于组件内部,用户仅需要配置ajax等属性即可。当接口调用的入参和出参不满足需求时可在beforeRequest和beforeRender属性中拦截修改。
table的列渲染可以使用cell实现,在cell中可以直接使用cellData关键字,渲染时它是表格每行的数据。更多关于表格的使用说明请查看table组件。
查看详细代码
- list.dml
- list.js
<page title="人员信息">
 <actions>
    <button text="新建人员"></button>
 </actions>
 <head>
     <form type="search" confirmButton bind-confirm="handleSearch">
         <item label="姓名" node="input" name="name" placeholder="请输入人员姓名"></item>
         <item label="学历" node="select" name="education" data="{{educations}}"></item>
     </form>
 </head>
 <table x="myTable"
        type="super"
        pageable="{{ paginationConfig}}"
        ajax="{{ajax}}"
        bind-column-changed="tableFilterChange"
        columnSettable="{{columnSettable}}">
     <cell label="No." name="rowNO" :visible="true" fixed="left">
         {{cellData.rowNO}}
     </cell>
     <cell label="姓名" name="name" :visible="true">
         {{cellData.rowData.name}}
     </cell>
     <cell label="出生日期" name="date" :visible="true">
         {{cellData.rowData.date}}
     </cell>
     <cell label="省/直辖市" name="province" :visible="true">
         {{cellData.rowData.province}}
     </cell>
     <cell label="市区" name="city" :visible="true">
         {{cellData.rowData.city}}
     </cell>
     <cell label="详细地址" name="address" :visible="true">
         {{cellData.rowData.address}}
     </cell>
     <cell label="邮编" name="zip" :visible="true">
         {{cellData.rowData.zip}}
     </cell>
     <cell label="学历" name="education" :visible="true">
         {{cellData.rowData.education}}
     </cell>
     <cell label="职业" name="occupation" :visible="true">
         {{cellData.rowData.occupation}}
     </cell>
     <cell label="操作" fixed="right" type="control">
         <button text="编辑"></button>
         <button text="删除"></button>
         <button text="查看"></button>
     </cell>
 </table>
</page>
export default XPage({
    //存放模板使用的数据
    data: {
        ajax: {
            url: '//testapi-nodedmallos.dmall.com/cabinx/pcapi/table/data',
        },
        educations: [
            {label: '全部', value: ''}, {label: '大专', value: '大专'}, {label: '本科', value: '本科'}, {
                label: '研究生',
                value: '研究生'
            }
        ],
        columnSettable: {
            draggable: true, // 可以拖动
            persist: true,
            tips: '自定义列'
        },
        paginationConfig: {pageSize: 20},
    },
    //页面进入时执行
    show(){

    },
    //查询
    handleSearch(value) {
        const table = this.getComponent('myTable');

        table.query({params: value});
    },
});
- 实现增删查改逻辑
- 删除
dml中在表格的操作列添加删除按钮,点击时执行deleteHandler函数并透传该行的数据。
<cell label="操作" fixed="right" type="control">
    ...
    <button text="删除" bind-click="deleteHandler(cellData.rowData)"></button>
    ...
</cell>
js中使用确认框提示,确认后调用删除接口,成功后更新表格数据。
//删除人员信息
deleteHandler(data) {
    CabinX.confirm({text: `确定删除${data.name}?`}, (confirm) => {
        if (confirm) {
            //假的删除接口,仅用于参考
            CabinX.ajax({
                url: '//testapi-nodedmallos.dmall.com/cabinx/pcapi/table/data',
                method: 'get',
            }).then((res) => {
                if (res.code !== '0000') {
                    return;
                }
                //更新表格数据
                this.getComponent('myTable').query();
            });
        }
    });
},
- 查看
dml中在表格的每行添加查看按钮,同删除定义查看函数detailHandler,透传该行数据。添加pop和form存放人员的详细信息。
<table>
...
   <cell label="操作" fixed="right" type="control">
        ...
        <button text="查看" bind-click="detailHandler(cellData.rowData)"></button>
    </cell>
</table>

<pop x='detailPop' title="人员详情" bind-shown="detailPopShown">
    <form x="detailForm" type="info" layout="vertical" clearButton="{{false}}" confirmButton="{{false}}"
          labelSize="50px">
        <item node="input" colspan="{{3}}" label="姓名" name="name"/>
        <item node="input" colspan="{{3}}" label="学历" name="education"/>
        <item node="input" colspan="{{3}}" label="市区" name="city"/>
        <item node="input" ellipsis colspan="{{3}}" label="详细地址" name="address"/>
        <item node="input" colspan="{{3}}" label="职业" name="occupation"/>
    </form>
</pop>
js中实现点击查看时通过this.getComponent('detailPop').show()打开弹框,并在currentPersonInfo中暂时存放该行的数据。当pop确定显示完成后,给pop中的form设置该行数据:
this.getComponent('detailForm').setData({...this.data.currentPersonInfo})
pop,drawer等弹框类组件执行show()时该组件及其内容并不能马上渲染完成,这时操作他们内容的某些组件可能会有找不到的情况,需要等到组件完全渲染后成后操作,需要在shown时执行逻辑。
export default XPage({
    data:{
        ...
        currentPersonInfo:{},//存放当前操作的行数据
    },
    ...
    //查看详情
    detailHandler(data) {
        this.showDetailPop();
        this.setData({
            currentPersonInfo: data,
        });
    },
    //显示人员详情弹框
    showDetailPop() {
        this.getComponent('detailPop').show();
    },
    //详情的pop显示后执行
    detailPopShown() {
        this.getComponent('detailForm').setData({...this.data.currentPersonInfo});
    },
    ...
});
- 新增&编辑 新增和编辑的页面内容一致可以共用,这里我们抽出一个公共组件使用。
组件的dml中实现包含form表单的弹窗。
<pop x='myPop' title="{{title}}" bind-shown="shown">
    <form x="demoForm" layout="vertical" clearButton="{{false}}" confirmButton="{{false}}" bind-confirm="submitForm">
        <item node="input" name="name" label="姓名" required/>
        <item label="学历" node="select" name="education" data="{{educations}}"></item>
    </form>
    <actions>
        <button bind-click="hide" text="取消"></button>
        <button target="demoForm.confirm" text="确定" status="primary"></button>
    </actions>
</pop>
组件的js中接收标题(title),类型(type),表单渲染数据(data)和提交表单的回调函数(callback),对外提供弹框的show和hide方法。
export default XComponent({
    API: ['show', 'hide'],// 需要对外部暴露的API方法,不支持属性,通过getComponent方法获取对象调用
    props: ['title', 'type', 'data', 'callback'],// 从外部传入的参数
    data: {// 和page一样,组件内部数据
        educations: [
            {label: '大专', value: '大专'},
            {label: '本科', value: '本科'},
            {label: '研究生', value: '研究生'}
        ],
    },
    hooks: {// 生命周期函数
        show() {// 组件挂载后执行
        },
        hide() {// 组件销毁时执行
        },
    },
    show() {
        this.getComponent('myPop').show();
    },
    hide() {
        this.getComponent('myPop').hide();
    },

    //提交表单
    submitForm(formData) {
        const {callback, type} = this.props;
        this.getComponent('demoForm').validate(() => {
            if (typeof callback === 'function') {
                callback(formData, type);
            }
            this.hide();
        });
    },

    //弹框显示后执行,注意:表单数据设置需要在弹框显示后执行,不能在hooks.show中,hooks.show执行时form表单还未渲染
    shown() {
        const {data} = this.props;
        this.getComponent('demoForm').setData(data);
    },
});
在list页面中使用自定义组件
<custom-pop x="formPop" callback="{{submitForm}}" type="{{popType}}" title="{{popTitle}}"
                data="{{formData}}"></custom-pop>
新增或编辑在提交表单时都需要调用对应接口,接口调用成功后重新更新表格数据和渲染。
export default XPage({
    data:{
        ...
        formData: {
            name: '',
            education: ''
        },
        popType: '',
        popTitle: '',
        currentPersonInfo: {},
    },
    ...
    //新增或编辑人员表单提交执行
    submitForm(data, type) {
        switch (type) {
            case 'add':
                //假的新增接口,仅用于参考
                CabinX.ajax({
                    url: '//testapi-nodedmallos.dmall.com/cabinx/pcapi/table/data',
                    method: 'get',
                }).then((res) => {
                    if (res.code !== '0000') {
                        return;
                    }
                    //更新表格数据
                    this.getComponent('myTable').query();
                    this.hidePop();
                });

                break;
            case 'edit':
                //假的编辑接口,仅用于参考
                CabinX.ajax({
                    url: '//testapi-nodedmallos.dmall.com/cabinx/pcapi/table/data',
                    method: 'get',
                }).then((res) => {
                    if (res.code !== '0000') {
                        return;
                    }
                    //更新表格数据
                    this.getComponent('myTable').query();
                    this.hidePop();
                });

                break;
        }
    },
    ...
});
- 完整代码
最后,这里是完整的页面代码。
页面完整代码
- list.dml
- list.js
- custompop.dml
- custompop.js
<page title="人员信息">
    <actions>
        <button bind-click="showPop('add')" text="新建人员"></button>
    </actions>
    <head>
        <form type="search" confirmButton bind-confirm="handleSearch">
            <item label="姓名" node="input" name="name" placeholder="请输入人员姓名"></item>
            <item label="学历" node="select" name="education" data="{{educations}}"></item>
        </form>
    </head>
    <table x="myTable"
           type="super"
           pageable="{{ paginationConfig}}"
           ajax="{{ajax}}"
           bind-column-changed="tableFilterChange"
           columnSettable="{{columnSettable}}">
        <cell label="No." name="rowNO" :visible="true" fixed="left">
            {{cellData.rowNO}}
        </cell>
        <cell label="姓名" name="name" :visible="true">
            {{cellData.rowData.name}}
        </cell>
        <cell label="出生日期" name="date" :visible="true">
            {{cellData.rowData.date}}
        </cell>
        <cell label="省/直辖市" name="province" :visible="true">
            {{cellData.rowData.province}}
        </cell>
        <cell label="市区" name="city" :visible="true">
            {{cellData.rowData.city}}
        </cell>
        <cell label="详细地址" name="address" :visible="true">
            {{cellData.rowData.address}}
        </cell>
        <cell label="邮编" name="zip" :visible="true">
            {{cellData.rowData.zip}}
        </cell>
        <cell label="学历" name="education" :visible="true">
            {{cellData.rowData.education}}
        </cell>
        <cell label="职业" name="occupation" :visible="true">
            {{cellData.rowData.occupation}}
        </cell>
        <cell label="操作" fixed="right" type="control">
            <button text="编辑" bind-click="showPop('edit',cellData.rowData)"></button>
            <button text="删除" bind-click="deleteHandler(cellData.rowData)"></button>
            <button text="查看" bind-click="detailHandler(cellData.rowData)"></button>
        </cell>
    </table>

    <custom-pop x="formPop" callback="{{submitForm}}" type="{{popType}}" title="{{popTitle}}"
                data="{{formData}}"></custom-pop>

    <pop x='detailPop' title="人员详情" bind-shown="detailPopShown">
        <form x="detailForm" type="info" layout="vertical" clearButton="{{false}}" confirmButton="{{false}}"
              labelSize="50px">
            <item node="input" colspan="{{3}}" label="姓名" name="name"/>
            <item node="input" colspan="{{3}}" label="学历" name="education"/>
            <item node="input" colspan="{{3}}" label="市区" name="city"/>
            <item node="input" ellipsis colspan="{{3}}" label="详细地址" name="address"/>
            <item node="input" colspan="{{3}}" label="职业" name="occupation"/>
        </form>
    </pop>

</page>
import customPop from './custompop/custompop';

export default XPage({
    components: {
        'custom-pop': customPop,
    },
    data: {
        ajax: {
            url: '//testapi-nodedmallos.dmall.com/cabinx/pcapi/table/data',
        },
        educations: [
            {label: '全部', value: ''}, {label: '大专', value: '大专'}, {label: '本科', value: '本科'}, {
                label: '研究生',
                value: '研究生'
            }
        ],
        columnSettable: {
            draggable: true, // 可以拖动
            persist: true,
            tips: '自定义列'
        },
        formData: {
            name: '',
            education: ''
        },
        paginationConfig: {pageSize: 20},
        popType: '',
        popTitle: '',
        currentPersonInfo: {},
    },

    //生命周期,页面进入时执行
    show() {
    },

    //查询
    handleSearch(value) {
        const table = this.getComponent('myTable');

        table.query({params: value});
    },

    // 表格列的变动后会触发这个方法(拖动、展示、隐藏、pin)
    tableFilterChange(data = []) {
        const fields = [];

        data.forEach((item) => {
            // 表格cell 上设置了名称 并且 visible 是ture 就代表是显示
            if (item.visible !== false && item.name) {
                fields.push(item.name)
            }
        })

        console.log('tableFilterChange: ', fields)

        return fields
    },

    //显示人员详情弹框
    showDetailPop() {
        this.getComponent('detailPop').show();
    },

    //显示新增或编辑人员信息弹框
    showPop(type, data) {
        const popTitle = type === 'add' ? '新增人员' : '编辑人员';
        this.setData({
            popType: type,
            popTitle: popTitle,
            formData: data || {},
        });
        this.getComponent('formPop').show();
    },

    //隐藏新增或编辑人员信息弹框
    hidePop() {
        this.getComponent('formPop').hide();
    },

    //查看详情
    detailHandler(data) {
        this.showDetailPop();
        this.setData({
            currentPersonInfo: data,
        });
    },

    //详情的pop显示后执行
    detailPopShown() {
        this.getComponent('detailForm').setData({...this.data.currentPersonInfo});
    },

    //新增或编辑人员表单提交执行
    submitForm(data, type) {
        switch (type) {
            case 'add':
                //假的新增接口,仅用于参考
                CabinX.ajax({
                    url: '//testapi-nodedmallos.dmall.com/cabinx/pcapi/table/data',
                    method: 'get',
                }).then((res) => {
                    if (res.code !== '0000') {
                        return;
                    }
                    //更新表格数据
                    this.getComponent('myTable').query();
                    this.hidePop();
                });

                break;
            case 'edit':
                //假的编辑接口,仅用于参考
                CabinX.ajax({
                    url: '//testapi-nodedmallos.dmall.com/cabinx/pcapi/table/data',
                    method: 'get',
                }).then((res) => {
                    if (res.code !== '0000') {
                        return;
                    }
                    //更新表格数据
                    this.getComponent('myTable').query();
                    this.hidePop();
                });

                break;
        }
    },

    //删除人员信息
    deleteHandler(data) {
        CabinX.confirm({text: `确定删除${data.name}?`}, (confirm) => {
            if (confirm) {
                //假的删除接口,仅用于参考
                CabinX.ajax({
                    url: '//testapi-nodedmallos.dmall.com/cabinx/pcapi/table/data',
                    method: 'get',
                }).then((res) => {
                    if (res.code !== '0000') {
                        return;
                    }
                    //更新表格数据
                    this.getComponent('myTable').query();
                });
            }
        });
    },
});
<pop x='myPop' title="{{title}}" bind-shown="shown">
    <form x="demoForm" layout="vertical" clearButton="{{false}}" confirmButton="{{false}}" bind-confirm="submitForm">
        <item node="input" name="name" label="姓名" required/>
        <item label="学历" node="select" name="education" data="{{educations}}"></item>
    </form>
    <actions>
        <button bind-click="hide" text="取消"></button>
        <button target="demoForm.confirm" text="确定" status="primary"></button>
    </actions>
</pop>
export default XComponent({
    API: ['show', 'hide'],// 需要对外部暴露的API方法,不支持属性,通过getComponent方法获取对象调用
    props: ['title', 'type', 'data', 'callback'],// 从外部传入的参数
    data: {// 和page一样,组件内部数据
        educations: [
            {label: '大专', value: '大专'},
            {label: '本科', value: '本科'},
            {label: '研究生', value: '研究生'}
        ],
    },
    hooks: {// 生命周期函数
        show() {// 组件挂载后执行
        },
        hide() {// 组件销毁时执行
        },
    },
    show() {
        this.getComponent('myPop').show();
    },
    hide() {
        this.getComponent('myPop').hide();
    },

    //提交表单
    submitForm(formData) {
        const {callback, type} = this.props;
        this.getComponent('demoForm').validate(() => {
            if (typeof callback === 'function') {
                callback(formData, type);
            }
            this.hide();
        });
    },

    //弹框显示后执行,注意:表单数据设置需要在弹框显示后执行,不能在hooks.show中,hooks.show执行时form表单还未渲染
    shown() {
        const {data} = this.props;
        this.getComponent('demoForm').setData(data);
    },
});
预览
在快速开始中也简单介绍了如果预览,项目启动后(cabinx dev)会弹出调试界面。
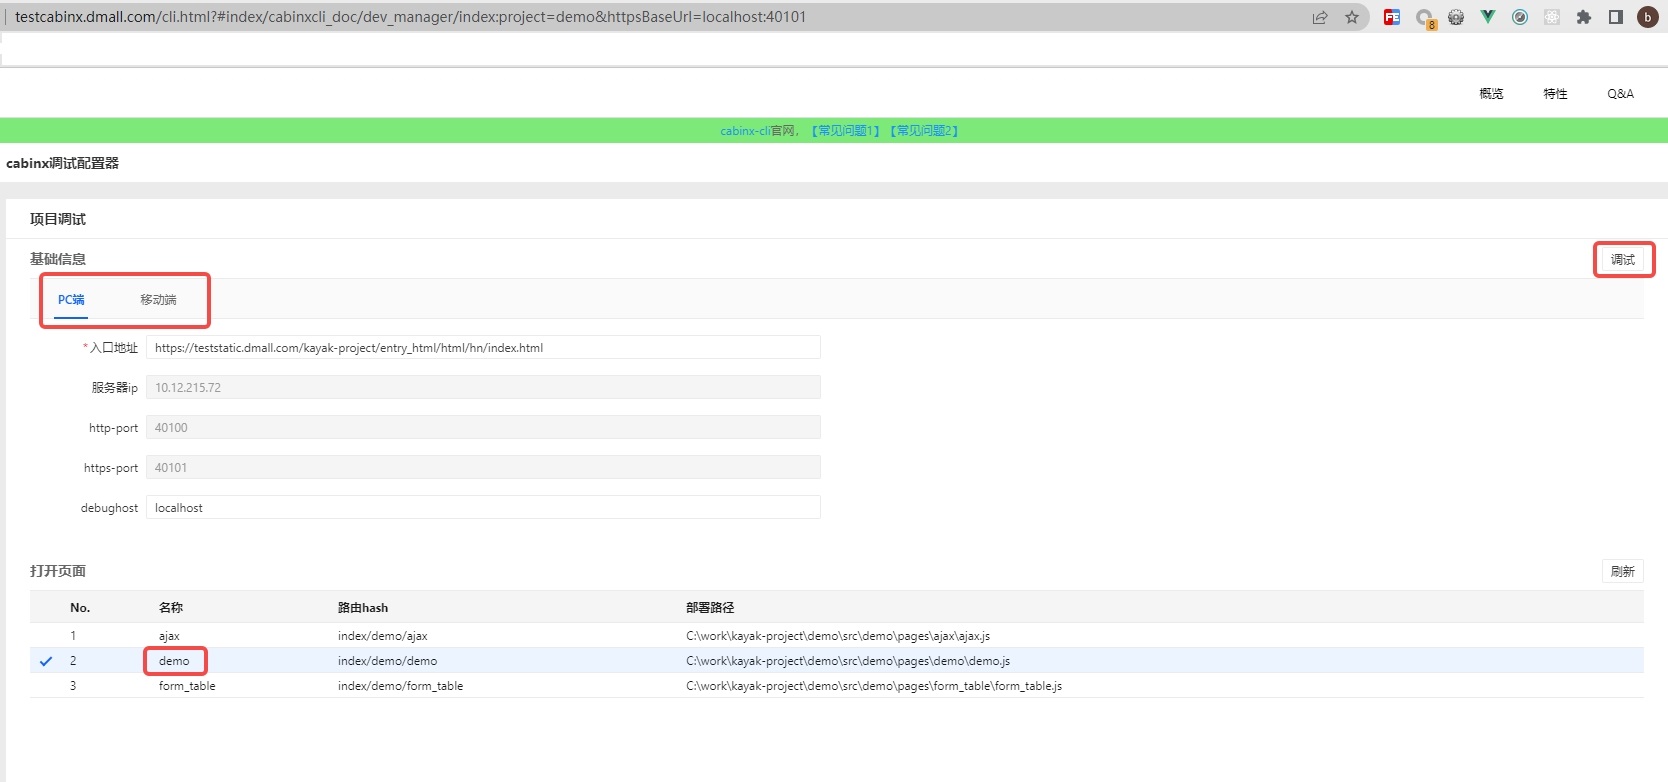
步骤如下:
- 基础信息部分选择PC端或移动端
- 打开页面部分选择预览的页面
- 点击调试,在弹出的pop框中点击打开查看,或通过对应APP扫码查看。
在web端查看手机效果可以开启浏览器的toolbar,切换手机模式后刷新下页面。
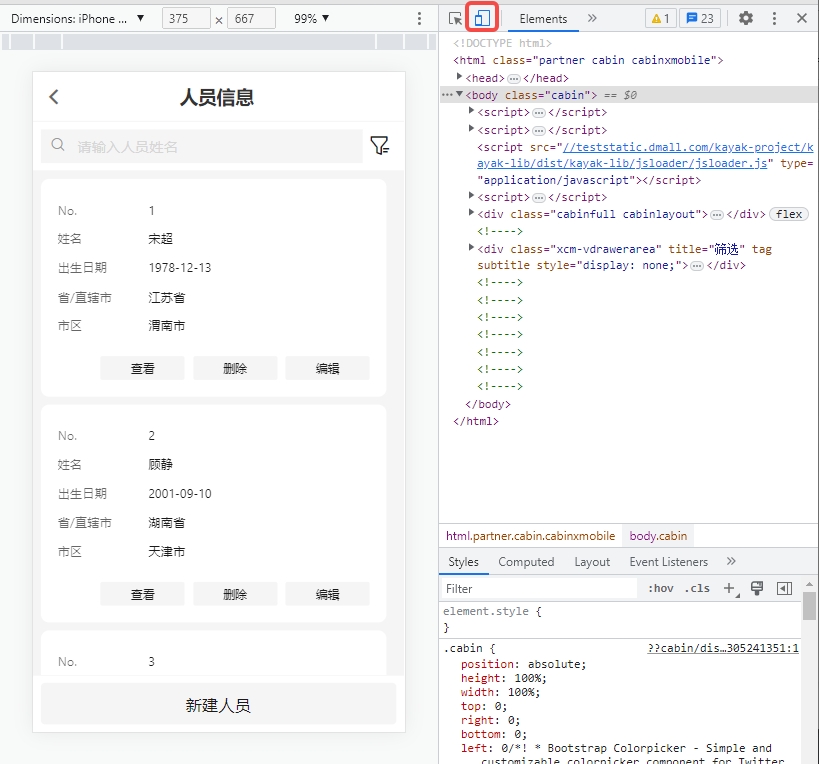
我们分别看下上面页面在两端的效果。
构建
cabinx build
编译成功后,项目的根目录会新增两个目录:dist、mobileapp。H5环境仅需要dist即可。移动端一般会用到my_demo.zip项目的zip包。
my_demo
    ├── dist
    ├── mobileapp
    │     ├── my_demo
    │     ├── SDK-cabinx
    │     ├── my_demo.zip
    │     └── SDK-cabinx.zip
部署
PC比较简单,一般在阿拉丁系统对应商业版本部署即可,具体方式请查看阿拉丁的手册。移动端较复杂,具体操作需要查看客户端同学的文档,可以去前端业务线文档入口中查找对应负责人和文档。
阿拉丁系统支持服务端编译的配置,但考虑到不支持脚手架和node版本切换,所以暂时不建议使用服务端编译,本地编译更安全。